Posted At: Apr 04, 2025 - 3,520 Views

Step-By-Step Instructions For Installing Mechanical Seals
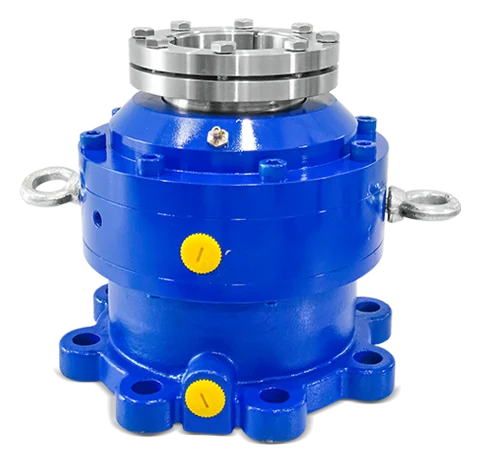
Installing mechanical seals correctly is essential for ensuring the long-term reliability and leak-free performance of pumps and rotating equipment. A mechanical seal that’s installed with care can reduce downtime, prevent seal failures, and extend equipment life. In this guide, we walk you through step-by-step instructions for installing a mechanical seal, along with best practices to ensure optimal mechanical seal fitting and pump seal replacement. Click here and get more information about mechanical seals.
Understanding Mechanical Seal Assembly
Before diving into the installation, it’s important to understand the key components involved in a mechanical seal assembly.
A typical mechanical seal consists of:
A stationary seal face
A rotating seal face
Secondary sealing elements like O-rings or gaskets
A spring or bellows mechanism for loading the seal faces
Each part plays a role in keeping the fluid contained while accommodating shaft rotation and any minor misalignments.
Tools and Safety Precautions
Before beginning the process of installing a mechanical seal, ensure you have:
Clean, lint-free cloths
Lubricant recommended by the seal manufacturer
Calipers and other measuring tools
Personal protective equipment (gloves, safety glasses)
Always follow the manufacturer’s guidelines and maintain a clean, dust-free environment.
Step-By-Step Installation Guide
1: Disassemble the Pump
Turn off and isolate the pump from any power source. Remove the pump from service and disassemble the necessary components to access the seal chamber. Clean the shaft and seal housing thoroughly to remove any old seal remnants, dirt, or debris.
2: Inspect Seal and Components
Check all seal parts for visible damage. Ensure that the replacement seal matches the pump specifications. Inspect the shaft or sleeve for wear, scoring, or uneven surfaces that could compromise the seal.
3: Lubricate the Components
Apply a thin film of clean lubricant (recommended by the seal manufacturer) to the shaft, O-rings, and other elastomer components. This will ease the installation and prevent damage during assembly.
4: Install the Stationary Seal
Carefully place the stationary part of the mechanical seal into the seal housing. Make sure it is properly aligned and seated. Use a soft cloth to press the seal face gently to avoid scratching.
5: Install the Rotating Seal
Slide the rotating part of the seal onto the shaft with gentle, even pressure. Be cautious not to twist or apply uneven force. The seal face should be parallel to the stationary face for proper contact.
6: Final Assembly and Adjustment
Position the gland plate (if present) and tighten the bolts evenly in a crisscross pattern. This ensures even pressure distribution and proper alignment. Rotate the shaft manually to check for smooth movement.
7: Test and Monitor
Once reassembled, test the pump under controlled conditions. Check for leaks and monitor the seal's performance during startup. Allow the system to reach full operating conditions and continue observation for a period.
Tips for a Successful Mechanical Seal Fitting
- Always read and follow the specific seal manufacturer's instructions.
- Avoid using oil-based lubricants unless recommended.
- Handle the seal faces with extreme care to avoid scratches.
- Never force the seal into place. If it doesn’t fit easily, recheck measurements.
When Should You Consider Pump Seal Replacement?
Regular inspection and monitoring will help you identify the signs of seal wear or failure. Common indicators include:
- Visible leaks from the seal chamber
- Unusual noises or vibrations
- Decreased pump performance
- Excessive heat buildup near the seal area
- If you notice any of these signs, it may be time for a pump seal replacement.
Conclusion
Correctly installing mechanical seals is a crucial part of maintaining your pump systems. Whether you're dealing with routine maintenance or emergency repairs, following these detailed steps ensures long-lasting performance and reduces the risk of unexpected breakdowns. With proper attention to detail and adherence to manufacturer guidelines, you can master the art of mechanical seal fitting and keep your equipment running smoothly.
If you’re unsure about the process or need expert help, consider reaching out to a trusted mechanical seal supplier like QMSeals for guidance and support.
Frequently Asked Questions:
1. What is the correct way to install a mechanical seal?
To install a mechanical seal properly, ensure all pump components are clean, align the seal faces accurately, lubricate the O-rings, and tighten the assembly to manufacturer-recommended torque values. Always follow the step-by-step instructions specific to your seal type.
2. What precautions should I take before installing a mechanical seal?
Before installing, inspect the shaft and seal components for damage or wear. Make sure the area is clean and free of contaminants. Check compatibility of the seal material with the pumped fluid and confirm alignment to avoid premature failure.
3. Do I need any special tools for mechanical seal installation?
Generally, no special tools are required, but using proper alignment tools, torque wrenches, and lubricants will make the process more accurate and safe. Some cartridge seals may include installation kits to make the process easier.
4. Can I reuse an old mechanical seal during reassembly?
Reusing a mechanical seal is not recommended. Once a seal is disassembled, its sealing surfaces may not align properly again, leading to leaks or failure. Always use a new seal when replacing or repairing a pump.
5. How do I know if my mechanical seal is installed correctly?
If the pump operates without leaks, vibration, or unusual noises, and the seal runs cool under normal operating conditions, it’s a sign the installation was successful. Monitoring over the first few hours of operation is also recommended.


